About Me

My photo
I am a wife, mama and grandmama getting through life by hanging on to a needle and thread.

Friday, February 28, 2014

All Pressed And Dressed!

A quilty friend of mine brings the cutest little antique child's ironing board to classes and workshops with her, so she has her own ironing station right next to her chair.  Pure genius!  Not only is it cute, but it doesn't take up valuable work space on the table like a lot of portable ironing boards do!  I've been on the lookout for one of my own and a couple of weekends ago I found just what I was looking for...a nice stable child size ironing board for just the right price.  I wish I had taken a before photo...it had a piece of a horribly stained wool blanket stapled to the top, so that was the first thing to go.  After a good cleaning, I set out to make a new cover.  I'm a traditionalist at heart, so I picked a nice neutral reproduction fabric for the first cover, but when there was just enough backing fabric leftover from my Ami Simms quilt I could resist making a cover that was a little more fun and exciting! 

The tutorial that I used to make the ironing board covers can be found HERE


Wednesday, February 26, 2014

Sew Busy!

I've been so busy sewing that I haven't even taken time to blog lately.  I'm sorry about that, but as you can see it's been worth the wait.  I just love how my Ami Simms String Quilt turned out...I guess I should have finished it 5 years ago!

Friday, February 21, 2014

Another Finished Quilt

I made this little top quite some time ago with leftover squares from my son's Teenage Mutant Ninja Turtle quilt. Once again, I was just playing with scraps and design and once the top was finished I tossed it on the "to quilt" pile and forgot about it.  I love the bright primary colors with the white and it's the perfect size (36" square) for a car-seat or stroller quilt, so I'll probably set this one aside until I need a baby gift.

Wednesday, February 19, 2014

Labels...My Way

I figured out this method for printing labels after making a few labels on printable fabric sheets and finding there was a lot of waste once you cut out your label!  Those scraps of printable fabric are too expensive to throw away and my handwriting isn't good enough to write out my own label, so I had to come up with a way to print on the scraps.  It's easy...print out the text for your label on a plain piece of paper just as you want it to appear on the fabric, center a scrap of printable fabric over the text, and tape it to the paper on all four sides (make sure the tape doesn't cover any of the areas that will be printed).  Feed the paper with the printable fabric taped to it into the printer and print the label onto the fabric.  Voila!  No more waste!  At this point you can add the label to the quilt, or you can do as I do and add a border.  Simply cut 1" strips and sew them to the sides, top and bottom of the label.  Press the raw edges to the back and then use an applique stitch to attach the label to the back of the quilt. 

Ok, here's the fine print...I've used this technique for lots and lots of quilt labels and have not had a problem with running them through my HP printer ever.  I use regular scotch tape and all brands of printable fabric.  I prefer the fusible printable fabric over the sew in kind for the simple reason that the fusible does not have an annoying paper backing to peel off.  Fusible fabric also allows me to fuse the border to the back and then the label to the quilt (no pinning).  I do still hand stitch the label to the quilt even though it is fused.  If you do choose to use a sew in printable fabric, leave the paper backing on until after you have printed the label.

Monday, February 17, 2014

Waiting For The Perfect Fabric?

I started this quilt in an Ami Simms workshop back in 2009!  I couldn't decide on backing for it, so I added it to the mountain of quilt tops to be quilted and promptly forgot about it.  One of my favorite quilt shops was having a sale at the beginning of the month, so I thought it would be a good opportunity to shop for a backing fabric for this top.  I figured any batik would do, but when I walked into the store and saw the display of Bloom Crazy fabrics, I knew it was the perfect backing for this quilt!  Perhaps I set this quilt aside just to wait for the perfect backing fabric to come along or maybe that's just a good excuse from this quilting procrastinator, but either way, I'm glad I waited because I absolutely love these two together!

Friday, February 14, 2014

One Quilt At A Time

My quilting machine is really getting a workout these days!  Of course, it helps that there is over a foot of snow outside, so I really don't want to leave the house.  I might as well stay home and quilt, right?  I finished this top at a charity workshop that our guild held last April.  I'll be the first to say it...shame on me for not finishing this charity quilt sooner!


I even had the backing pieced and folded with it, so I have no excuse other than it was swallowed up by the massive "to quilt" pile.  However, that pile is getting smaller...one quilt at a time!  

Wednesday, February 12, 2014

I'm On A Mission

I started this little quilt back in March of 2011 as an experiment just to try some Crazy Nine Patch blocks.  I liked how the top turned out, but as usual for me, I promptly folded it and added it to the "quilt another day" pile (AKA mountain of UFO's). Yes, I'm on a mission...a mission to finish my UFO's!  It may take me the whole year to do it, but I have accepted the mission and I will climb that mountain! 

Monday, February 10, 2014

More Wool Socks

Our little Miss Five is now 6 months old and has already outgrown the socks that I made for her at the beginning of the winter.  There's a foot of snow on the ground, more falling from the sky, and low temperatures are predicted to remain in the single digits for the rest of the week.  Something tells me that we still have a lot more winter to go, so the baby is going to need some new heavy socks!  Thankfully I've made this sock pattern so many times, that I can make them quick and without too much thought...I'll be able to get them done long before it gets too warm for wool socks! 

Friday, February 7, 2014

Dark Chocolate Chocolate Chip Cookies

You just can't go wrong with chocolate and a little more chocolate!

Dark Chocolate Chocolate Chip Cookies

1 egg
1/4 cup sugar
1/2 cup brown sugar
1/2 cup shortening
1 teaspoon vanilla
1/4 cup dark cocoa
1 cup flour
1 teaspoon baking soda
1/2 teaspoon salt
1 cup mini chocolate chips

Combine first five ingredients in a mixing bowl and mix well. Add dark cocoa, flour, baking soda and salt gradually, mixing well after each addition. Stir in chocolate chips. Drop by teaspoonfuls onto cookie sheet. Bake at 350 degrees F for 10 minutes or until light brown. Cool on cookie sheet for two minutes. Remove to wire rack to cool completely.

Yield: 2 dozen

Wednesday, February 5, 2014

1/4"...Who Knew?

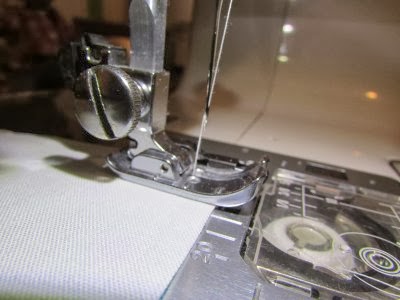
I've been working on the Anita's Arrowhead blocks and at one point you have to stop and pivot around a corner at the 1/4" mark.  I'm pretty good at eyeballing a 1/4", but for these blocks I've been marking them...just to be sure.  As I was sewing along, I noticed that when I stopped to pivot there was a raised mark on the left side of my foot that lined up with the edge of the fabric.  WHAT?  Seriously?  All this time I thought this quarter inch foot was just to get an accurate 1/4" seam, but had NO CLUE that there are 1/4" registration marks along the other edge of the foot!  Perfect for these blocks, mitering bindings and probably a bunch of other things that I can't think of right now.  Who knew?  And why didn't you tell me???

Monday, February 3, 2014

Paying It Forward And Forward Again

Now I know why Bob Barker was always telling us to get our pets spayed or neutered...they multiply!  Apparently it's true with pet themed quilt blocks too!  I had a few blocks leftover from the cat quilt that I just finished and a friend mentioned that she had a friend who was having surgery soon and that she liked cats...one thing led to another and we passed the leftovers to her and we all made a couple more blocks for another cat quilt.  That quilt has since been finished and delivered and we still have a few orphan cat blocks, so we are going to make a few more blocks to make a quilt to donate to CONCERN (the MLQG's outreach project for foster kids).  Amazing how all this has come from one little kitty cat block!

You can find instructions for this block at http://quilting.about.com/od/blockofthemonth/ss/cat_quilt.htm

Blog Archive